The Cheeky Monkey Media Blog
A few words from the apes, monkeys, and various primates that make up the Cheeky Monkey Super Squad.

Increase Your SEO ‘Performance’
 July 20, 2021 / Treena Bjarnason
Umm…Do You Have Performance Issues?
Performance is one of four major headings that Google uses when ranking your website for search engine optimization. Beyond that, poor performance can lead to a frustrating experience and even direct traffic away from your website. To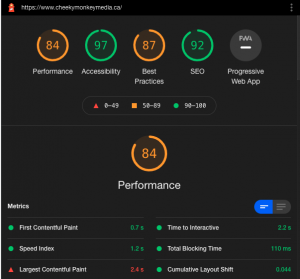 this end, it was extremely important for us to speed up our own Cheeky Monkey Media site, and figured it was best to share some of the tips and tricks to increase your SEO performance that we learned along the way.
To start this adventure, I took a look at our Google Lighthouse report score. If it’s not on your radar yet, Lighthouse is an open source tool offered by Google to aid in increasing your website’s performance in four areas: Performance, Accessibility, Best Practices and SEO (and the less applicable Progressive Web App), but for this article I’m focusing on the Performance aspect. Lighthouse does an awesome job of breaking down what is negatively impacting your website’s score so that you are able to work towards a fix. Here are the major findings on our own site.
Image is Everything!
Right off the bat, the biggest red flag about the speed of our site was the size of our images. Because our homepage is so dense with massive images (many of which are overlapping one another), the time to load them all was brutal. It was clear I needed to improve on the size of these images, as well as look into other options about how they are displayed on the page. To begin with I started with manually resizing the most offending images, particularly large PNG images with big areas of alpha (or transparency). Right away we saw an increase in the load time of the website, but it was clear that resizing the thousands of images that many modern media-focused websites have would not be a feasible solution, so something better was needed.
Another possible solution that you can explore is to convert your images to a more modern file format than JPEG or PNG. The most recommended format currently is WebP, which reduces the size of images significantly without making them look any worse to the eye. Unfortunately and ironically, you may run into issues (at the time of this article) using this format as it isn’t supported by default in the popular CMS’s, and only 70-75% of users browsers will support the file format. This means the files must be loaded dynamically depending on the end users platform, as well as having specific web host support.
Plugin Positive

Thus began the search for optimization plugins for media libraries on WordPress. After trying a few different plugins that promised help with compression of media on the page, the best one we found was Smush. Even the free version of this plugin does an awesome job with image compression, though at a rate of 50 images at a time it might require some time to convert an entire website, as well as automatically compressing new uploads after the fact. With just the free version we were able to compress nearly 50MB out of our images, with no change to the quality of the images on the website. The plugin also comes boxed with a Lazy Load feature which has also helped the user experience a ton.
Why Be Lazy with Your Loads?
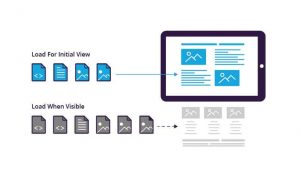
Lazy loading is a method in which the webpage only loads media when it is needed to be displayed to the user.
In theory this means an interruption to the use of your webpage, but it will be interactable and appear to load much faster to the end user. With Smush (or other plugins that accomplish the same basic idea), I was able to ensure that images weren’t all loaded as soon as the page was requested, but dynamically as a user scrolls the page. From my testing, this caused no hiccups in the display of the webpage, but increased the initial load time by another few seconds in the worst case, which was critical to us.
Lazy loading can also be applied to iFrames, videos and other embeds. For our website, I was able to change our WebOps explainer video to a lazy loaded style. In this case, the lazy load replaces the request to YouTube for the entire video with just one for a thumbnail, and this change alone increased the page’s load time by nearly a full second, without slowing or stopping the user from watching it in any way.
Third Wheels & Third Party Code
The last major issue that our Lighthouse score revealed was that of third party code running on our page. But this is where things get tricky. With the constant use of plugins (WordPress) or modules (Drupal), as well as simply third party JavaScript libraries and frameworks, websites constantly use third party code when the website loads. Because of this, our site was slowed down as it relies on the third party code to be fast, and even when it is, the webpage must wait for the request to be completed. Luckily for us, the worst offender of third party code slowing down the load time of our site was the request for the entire YouTube video on load, which the lazy loading massively helped solve. The best way to help solve or reduce the impact that these third party plugins have on your website is to ensure they are loading responsibly wherever you have the power to do so, and simply deactivating or removing libraries that are unnecessary or unused.
In Conclusion (Yet Just the Beginning)
The topics we discussed here are just a starting point for optimizing your website’s performance for SEO. It’s important to take these steps as it’s more and more common for the load time of your website to directly correlate with your search engine placement, not to mention your user retention times. Also, increasing your website’s performance is not a one time solution, but an iterative process that needs consistent upkeep to keep your pages running as quickly and smoothly as they can – without ever compromising the user experience.