This tutorial is written for new Drupal developers or PHP developers who want to learn drupal. You can find the part 1 of the tutorial here: Drupal Tutorial Part 1
Last time, we created a simple recipe module with save and load functionality. The user interface is not very friendly yet, and users have to enter a recipe id in the URL to load it.
Today, we are going to improve the usability of the module by adding some UI element to it. By the end of the tutorial, you will be able to add, and list recipes. Editing, deleting, enable/disable recipes will be covered in the next tutorial.
This is what we will do in this Drupal tutorial:
- Use theme function to create a table
- Use Devel tools
Step 1: Install the Devel Module
First, let’s get the devel module to help us out.
Install the devel module by the following drush command:
drush en devel -y
You can also download the module manually from Drupal.
If you install it manually, make sure you enable the devel module after the installation, otherwise you will get a white screen by calling an undefined function.
Step 2: Get the Data from the Database
Modify the simple_recipe.module file located at sites/all/modules/custom/simple_recipe
To add a new function, simple_recipe_get_recipes($uid, $status), we are going to have two parameters for this; A drupal user id, and receipt status.
/**
* Load recipes from given user.
*
* @param int $uid
* User id.
*/
function simple_recipe_get_recipes($uid, $status = 2) {
$query = db_select('simple_recipe', 'sr')
->fields('sr')
->condition('sr.uid', $uid);
// Decide what to load.
switch($status) {
case 0:
// Disabled recipes.
$query->condition('sr.status', 0);
break;
case 1:
// Enabled recipes.
$query->condition('sr.status', 1);
break;
default:
// Load every recipes.
break;
}
$result = $query->execute()
->fetchAll();
return $result;
}
Step 3: Register a Path for the Recipe Listing Page
Now we are going to create a new page to list all the data. We will need to register a path for this page, so let’s modify the simple_recipe_menu(),
/**
* Implements hook_menu().
*/
function simple_recipe_menu() {
$items = array();
$items['user/%user/simple_recipe'] = array(
'title' => 'Simple Recipe',
'description' => 'The recipe form',
'page callback' => '_simple_recipe_list_recipes',
'page arguments' => array(1),
'access callback' => '_simple_recipe_access_check',
'access arguments' => array(1),
'type' => MENU_LOCAL_TASK,
);
$items['user/%user/simple_recipe/add'] = array(
'title' => 'Simple Recipe',
'description' => 'The recipe form',
'page callback' => 'drupal_get_form',
'page arguments' => array('simple_recipe_form'),
'access callback' => '_simple_recipe_access_check',
'access arguments' => array(1),
'type' => MENU_LOCAL_TASK,
);
return $items;
}
As you can see, we are going to use the user/%user/simple_recipe path for listing all the recipes. user/%user/simple_recipe/add for inserting a new recipe.
Step 4: Populate the Recipe Listing Page
It’s now time to add another function _simple_recipe_list_recipes()
/**
* List all the recipes from a given user.
* @param User Obj $account
* @return string
*/
function _simple_recipe_list_recipes($account) {
$recipes = simple_recipe_get_recipes($account->uid);
dsm($recipes);
return ' ';
}
Note:
dsm() is a function from the devel module, you pass a variable that you want to inspect as the argument. It will generate a human-friendly version of the variable for you.
Now, let’s visit user/1/simple_recipe
If you(admin) have previously entered any recipes, you should be able to see them in the krumo output.
Now that we have the recipes loaded, it’s time to create a table to hold them.
- create an array to hold table’s header
- create an array to hold table’s row
- loop through each recipe and fill rows array
- call theme function to create the html table
The _simple_recipe_list_recipes function should looks similar to this one:
/**
* List all the recipes from a given user.
* @param User Obj $account
* @return string
*/
function _simple_recipe_list_recipes($account) {
// Lets change the page title.
drupal_set_title(t('Recipes'));
// Declare table header.
$header = array(
t('Name'),
t('Date Saved'),
t('Options'),
);
// Declare table rows.
$rows = array();
// Load all saved recipes.
$recipes = simple_recipe_get_recipes($account->uid);
// Added each recipe as a table row.
foreach ($recipes as $recipe) {
$operation = $recipe->status ? 'Disable' : 'Enable';
// Unserialize the data, so we can actually get its value.
$recipe_values = unserialize($recipe->form_values);
// Add a table row.
$rows[] = array(
l(t($recipe_values['name']), "user/$account->uid/simple_recipe/edit/$recipe->rid"),
format_date($recipe->timestamp, 'medium'),
l(t('Edit'), "user/$account->uid/simple_recipe/edit/$recipe->rid") . ' | ' .
l(t('Delete'), "user/$account->uid/simple_recipe/delete/$recipe->rid") . ' | ' .
l(t($operation), "user/$account->uid/simple_recipe/statue/$recipe->rid"),
);
}
// Create a button to create recipe.
$create_btn = l(t('Create Recipe'), "user/$account->uid/simple_recipe/add", array("attributes" => array("class" => array('button'))));
if (!empty($rows)) {
return $create_btn . theme('table', array('header' => $header, 'rows' => $rows));
}
else {
return '
' . t('You don't have any recipe saved yet.') . '
' . $create_btn . '
'; } }
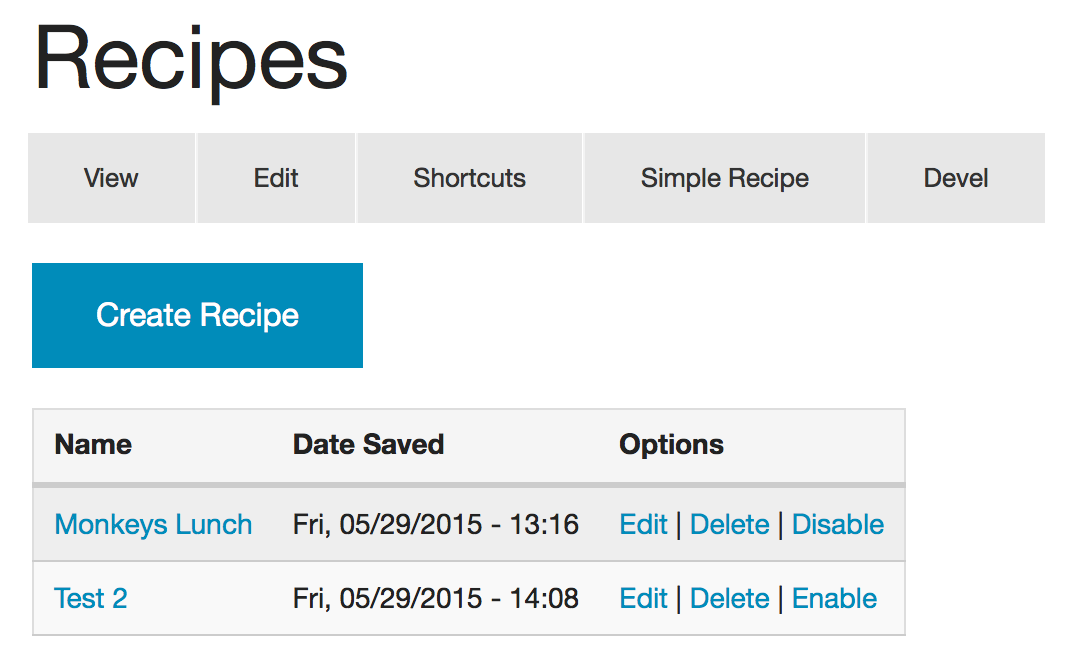
Your end result should look like this:

That’s all for this tutorial, I hope you enjoy reading it. You can find part three of the tutorial here.
Find the source code here:
Need help with a Drupal project? Did you know that Cheeky Monkey Media works with other agencies that need extra hands on projects? Our Drupal Web Developers are ready to help. Call us!


